
---------------------------------------------------------------------------------------
Photography, in my opinion, is not just an art. I believe it is an intricate mixture of both art and science, and each individual photographer brings to the world their own creative mixture of the two. Decisions such as composition, subject, setting, etc. are all artistic decisions made by the photographer to turn what is in front of them into the image they see in their heads. The scientific side of photography involves exposure, aperture, ISO speeds, focal lengths, and so forth. The highly specific design of each part comes together with the photographer’s artistic control to form an image. The two groups are not exclusive, either. Science can influence your artistic style, and artistic style can override the rigorous science behind each image. That is to say, a photograph isn’t created with a simple equation that will always produce a quality outcome. Its complex, it’s full of tricks, compromises, personal preferences, and mistakes that sometimes work out for the better. The best way to take a photo is not the right formula, but the right formula for you.
The Science:
The biggest difference between the two ingredients in your personal mixture of photography is knowledge. You cannot learn to be artistic and creative; at most you can learn how to express your own creativity better. Anyone can show you how to frame a photo better, but nobody can teach you what to frame, that’s entirely you. Because of this, I focused entirely on the science behind photography, teaching myself out of how-to books and flipping through countless magazines, published photography albums, and researching every detail I didn’t understand. Out of the 2-3 dozen books I read, each of them boiled down to the same points: shutter speed, aperture, ISO, focal length, and composition rules. Each of these particular points control major elements of a photo and in the hands of the right photographer can mean the difference between a good photo, and a great photo. If you are using a compact style camera without interchangeable lenses, fear not. Even the most basic of point-and-shoot cameras allow the user to control a few of these settings, albeit not as easily as a SLR-type camera.
 |
| Taken from: Source |
The devil’s in the details: Aperture
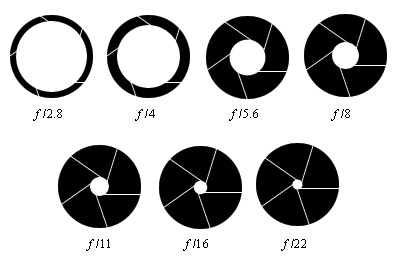
I want to start with aperture because of its importance in your overall photograph, most importantly, light. The aperture of a camera is designed as a series of blades that open and close to form pupils of various sizes. The size itself is a measurement of focal length divided by the diameter of the pupil formed. The most common way to reference this number is f/#, where your # changes based on the aperture setting used. Mathematically, the # scale assumes the form 1/sqrt(2)^n. For those of you who don’t want to do the math, this equation results in the following table.
| 1.0 | 1.4 | 2 | 2.8 | 4 | 5.6 | 8 | 11 | 16 | 22 | 32 |
Each of these numbers corresponds to what is commonly called a ‘full stop’ of light. So why does this matter? The aperture controls two important aspects of a photo, light and focus. For every full stop increased/decreased, the light reaching your camera changes by a multiple of 2. Now for the tricky part! If you were to start at f/8, and you would like double the amount of light, you would change your camera to f/5.6. If you would like half the amount of light, you’d go to f/11. Seems backwards doesn’t it? Remember, your aperture is actually a fraction, f/#, where f is related to your lens’ focal length. So if you are using a 50mm lens, you’re actually changing between 50/5.6, 50/8, and 50/11. So now you can see, if your aperture value is lower, you’re actually increasing the light. The diagram above should help you visualize that concept.
The second part of the aperture that makes it important is focus. Have you ever seen a photo of a flower with the entire background blurred out, or a person with blurry orbs of light in the distance? These are related to the aperture setting used on the lens.
Depth of field is a term used to describe everything in reasonable focus within an image. You can think of it as an extendable ruler on the ground. As you get closer to f/1 your depth of field shrinks, resulting in a shorter ruler. As you go towards f/32, your ruler extends towards infinity. When your photo is taken, everything inside your ruler’s length is considered in focus, while everything outside of your ruler’s length is blurred.
Don’t Blink: Shutter Speed
So what do you do when you set the depth of field you’d like? The next setting on your list is shutter speed. You’re most likely familiar with shutter speed, it’s the reason photos taken inside almost always come out blurry when you don’t use a flash. Point-and-shoot cameras do their best to reduce that blurring by changing the aperture to increase the light, but many times the flash is triggered to help you out. So what can you do?
The exposure settings function in the exact same way as the aperture, with one special relationship. To keep a photo exposed properly, aperture and shutter speed are balanced against each other. Exposures are calculated as lengths of time, usually in fractions of a second. Many point-and-shoot cameras use a value of 1/60 sec with a flash, and if you look at the Canon AE-1 (film camera circa 1976), there is a flash logo next to the setting for 1/60th sec. the Canon 60D allows for several shutter speeds, but the primary set is:
| B | 30 | 15 | 8 | 4 | 2 | 1 | 1/2 | 1/4 | 1/8 |
| 1/15 | 1/30 | 1/60 | 1/125 | 1/250 | 1/500 | 1/1000 | 1/2000 | 1/4000 | 1/8000 |
Each of these values is a factor of two in light, just like aperture settings. Going back to aperture, if you know a photo is exposed properly at f/8 with a shutter speed of 1/500, but you want to use f/5.6, then you have to make the exact opposite change to counter the increase in light. This means you will need to use a shutter speed of 1/1000 instead of 1/500. Similarly, if you want a photo at f/11, you’ll want to increase your light to 1/250.
Unfortunately, point-and-shoot cameras are limited in how they approach shutter speeds, and you may find that you cannot take photos faster than around 1/1000. Needing this additional range is rare and used mostly for fast action photography or extremely bright days, so it may be unnecessary for your photographic needs.
Raising the bar: ISO Speed
So now you’re juggling two settings on your camera, aperture and shutter speed. Eager to try these out, you decide to take photos of your friend playing sports after the sun has gone down, only to discover you can’t get the photos to stop blurring! You’ve reached your cameras threshold, and without a flash, you can’t stop the action as well as you could during the day. So what can you do? Cameras include a setting called ISO speed, named for the International Organization for Standardization. Bit of an odd holdover from its original title of ISO 5800:1987, but that’s not important. What is important is what it means!
The ISO value was originally related to film and how quickly the film could become exposed under light. The lower the value, the longer it took to expose. To speed up the film development, the grain of the film was made larger, resulting in increasing ISO values. The caveat to this is that as the grain increases, the more likely it is that you will see the grain, and not the overall composition. Film photos taken at night have a noticeable speckling in the sky with film in speeds of 200+. Modern digital cameras use a different technique, but with similar results.
The ISO speed can be thought of as a multiplier, operating in the same fashion as shutter speed and aperture in how much light is required to properly expose a scene. Canon cameras use a baseline of 100 to describe the lowest ISO speed, and increase twofold for every ‘stop’ above that. The Canon 60D has the following range of full stop settings:
| 100 | 200 | 400 | 800 | 1600 | 3200 | 6400 | 12800 |
With every increase in setting, the camera performs what is called a ‘gain’. What that means is that the camera takes the original value, and multiplies it to a higher value. Since each of the above settings results in an additional stop of light being gained, it is possible to take a photo that requires a shutter of 1/2 a second, and successfully take it at 1/250! So why don’t we always use this? The same monster from film days comes back to haunt us, but in the new form of noise.
Noise in a digital photo comes from stray light, hot sensors, and stray electricity. Since the sensor is indiscriminately multiplying all the light that hits it, random waves of light that may only hit the sensor once will cause the sensor to register sooner than normal. This shows up as a colored dot in the final image. To combat this, newer cameras have powerful processors designed to help reduce noise, and they work very well. The downside to these processors is power. The higher the ISO, the more noise reduction is needed, and it won’t be long before your battery is blinking.
Increasing your ISO is a very helpful setting, and it can help you go from blurry shots to well exposed action shots with a few buttons. It’s especially important when taking photos at venues with ‘no flash photography’ rules, or when your desired aperture/shutter combination is inadequate for a proper exposure. This setting is also used when filming video on digital cameras, since shutter speeds are unavailable (the shutter is held open indefinitely) and constantly changing apertures would result in inconsistent depth of field.
So that's the background on those three settings and a slight introduction on how you can use them. I think for the next few weeks, I'll work on more detailed descriptions of each setting with photos I took to provide examples. Hopefully I'll get around to more advanced techniques as well, but many require more control than point-and-shoot cameras allow. Until then, keep on shooting!
No comments:
Post a Comment